ADS 1

Showing posts with label thủ thuật blogspot. Show all posts

Tạo Read More tự động không dùng Javascript

(Huynh Nhat Ha's Blog) -- Phần lớn các blogspot hiện nay đều áp dụng thủ thuật tạo Read More tự động để hiển thị các bài viết mới nhất trên trang chủ, các trang nhãn và lưu trữ theo định dạng gồm ảnh đại diện và phần mô tả tóm tắt bài viết. Và chúng ta đều biết thì thủ thuật này phải dùng đến Javascript nên ít nhiều cũng ảnh hưởng đến tốc độ load trang.

Một bữa nọ ghé sang thăm blog của bạn Duy Phạm thấy có bài viết Auto readmore không sử dụng javascript cho Blogger. Tôi thấy tò mò nên đọc xem. Thì ra thủ thuật này tùy biến từ code của tiện ích Popular Posts của Blogger. Tôi nhận thấy đây cũng là một cách hay và cũng muốn phổ biến cho cộng đồng Blogger Việt. Tuy nhiên code của tôi khác một chút so với code của bạn Duy Phạm. Hy vọng với nỗ lực của Duy Phạm và Huỳnh Nhật Hà, từ nay cộng đồng Blogger sẽ phổ biến thuật ngữ Auto Readmore without Javascript. 

Dưới đây là hình minh họa kết quả sau khi áp dụng thủ thuật này.


Để làm được như vậy, bạn hãy thực hiện như sau. (Lưu ý nếu bạn đã áp dụng cách tạo Read More tự động sử dụng Javascript thì tháo nó ra khỏi Template trước khi áp dụng thủ thuật này)

Bước 1. Đăng nhập Blogger, vào Design >> Edit HTML, chọn Expand Widget Templates.

Đặt đoạn code sau đây trước dòng ]]></b:skin>.

.item-thumbnail {float:left;margin-right:15px;width:75px;height:70px}
.item-snippet {color: #999; font-family:Arial; font-size: 12px;text-align:justify}
.jump-link {float:right}
.jump-link a,.jump-link a:visited{background:#444343;margin-right:4px;padding:4px 8px;color:#FFF;text-shadow:1px 1px 1px #000;text-decoration:none;-moz-border-radius:5px;-webkit-border-radius:5px;border-radius:5px}
.jump-link a:hover,.jump-link a:active{background:#006666;color:#FFF;text-decoration:none;-moz-border-radius:5px;-webkit-border-radius:5px;border-radius:5px}

Bước 2. Tìm <data:post.body/> và thay nó bằng đoạn code bên dưới.

<b:if cond='data:blog.pageType != &quot;item&quot;'>
<b:if cond='data:blog.pageType != &quot;static_page&quot;'>
<div>
<b:if cond='data:post.thumbnailUrl'>
<img class='item-thumbnail' expr:alt='data:post.title' expr:src='data:post.thumbnailUrl'/>
<b:else/>
<img alt='no image' class='item-thumbnail' src='http://lh4.ggpht.com/_u7a1IFxc4WI/TTjruHJjcfI/AAAAAAAAAk0/i11Oj6i_bHY/no-image.png'/>
</b:if>
<div class='item-snippet'><data:post.snippet/></div>
</div>
<div class='jump-link'>
<a expr:href='data:post.url' expr:title='data:post.title'><data:post.jumpText/></a>
</div>
<span class='post-comment-link'>
<b:if cond='data:post.allowComments'>
<a class='comment-link' expr:href='data:post.addCommentUrl' expr:onclick='data:post.addCommentOnclick'><b:if cond='data:post.numComments == 1'>1 <data:top.commentLabel/><b:else/><data:post.numComments/> <data:top.commentLabelPlural/></b:if></a>
</b:if>
</span> 
<b:else/>
<data:post.body/>
</b:if>
<b:else/>
<data:post.body/>
</b:if>

Lưu Template là OK.

Nếu bạn muốn ảnh đại diện nằm bên phải thì thay dòng

.item-thumbnail {float:left;margin-right:15px;width:75px;height:70px}

Bằng dòng 

.item-thumbnail {float:right;margin-left:15px;width:75px;height:70px}

Điểm chú ý trong code của tôi tùy biến là phần mô tả tóm tắt bài viết (snippet), văn bản được căn đều hai bên (nhờ sử dụng class item-snippet có định dạng text-align:justify).

Tạo bài viết liên quan kèm ảnh Thumbnails cho blogspot


Thủ thuật hiển thị bài viết liên quan kèm ảnh Thumbnails ở đây thể hiện một cách chuyên nghiệp hơn. Bài viết này được lấy từ 1 số nguồn trên internet trong khi lang  thang .

relatedpost tipblogspot Tạo bài viết liên quan kèm ảnh Thumbnails cho blogspot
Đầu tiên: Đăng nhập vào blog –> Bố cục –> Chỉnh sửa HTML -> Mở rộng mẫu tiện ích
Sau đó tìm đến thẻ </head>


Chèn đoạn code dưới đây trước nó nhé:
<!–Related Posts with thumbnails–>
<b:if cond=’data:blog.pageType == &quot;item&quot;’>
<style type=”text/css”>
#related-posts {
float:center;
text-transform:none;
height:100%;
min-height:100%;
padding-top:5px;
padding-left:5px;
}
#related-posts h2{
font-size: 1.6em;
font-weight: bold;
color: black;
font-family: Georgia, &#8220;Times New Roman&#8221;, Times, serif;
margin-bottom: 0.75em;
margin-top: 0em;
padding-top: 0em;
}
#related-posts a{
color:black;
}
#related-posts a:hover{
color:black;
}
#related-posts  a:hover {
background-color:#d4eaf2;
}
</style>
<script src=’http://xemtruyenhinh.110mb.com/relatedthumbs21.js’ type=’text/javascript’/>
</b:if>
<!–Related Posts with thumbnails–>
Tiếp theo:  Tìm đến đoạn code tương tự sau:
<div class=’post-footer-line post-footer-line-1′>
Thay thế bằng đoạn code dưới :
<!– Start Related Posts with Thumbnails–>
<b:if cond=’data:blog.pageType == &quot;item&quot;’>
<div id=’related-posts’>
<b:loop values=’data:post.labels’ var=’label’>
<b:if cond=’data:label.isLast != &quot;true&quot;’>
</b:if>
<b:if cond=’data:blog.pageType == &quot;item&quot;’>
<script expr:src=’&quot;/feeds/posts/default/-/&quot; + data:label.name + &quot;?alt=json-in-script&amp;callback=related_results_labels_thumbs&amp;max-results=6&quot;’ type=’text/javascript’/></b:if></b:loop><a href=’http://www.bloggerplugins.org/2009/08/related-posts-thumbnails-blogger-widget.html’ style=’display:none;’>Related Posts with thumbnails for blogger</a><a href=’http://www.bloggerplugins.org/’ style=’display:none;’>blogger tutorials</a>
<script type=’text/javascript’>
var currentposturl=&quot;<data:post.url/>&quot;;
var maxresults=5;
var relatedpoststitle=”Related Posts“;
removeRelatedDuplicates_thumbs();
printRelatedLabels_thumbs();
</script>
</div><div style=’clear:both’/>
</b:if>
<!– End Related Posts with Thumbnails–>
Chú ý:   var maxresults=5; số 5 là giá trị max số bài viết hiển thị
Save lại —> kiểm tra kết quả thế nào nhé !
Chúc các bạn thành công !

Chèn quảng cáo vào giữa bài viết của Blogger

Có nhiều vị trí đặt quảng cáo trong phần bài viết của blog, như đã giới thiệu trong bài Chèn quảng cáo ads vào trong bài viết Blog. Tuy nhiên rất nhiều bạn hỏi cách thức đặt Ads vào phần giữa mỗi bài viết giống như một số Blog tham giá GA đã thực hiện được.
Trong bài viết này xin giới thiệu với các bạn cách đặt quảng cáo vào giữa mỗi bài viết trong Blog dành cho Blogger.

 Chèn quảng cáo vào giữa bài viết của Blogger
Cách thực  hiện:
topsong no1 Chèn quảng cáo vào giữa bài viết của Blogger Truy cập vào Blogger:
Truy cập vào Blogger Dashboard  >  Layout  >  Edit Html > Check vào ô chọn “Expand Widgets”
topsong no2 Chèn quảng cáo vào giữa bài viết của Blogger Chỉnh sửa Code trong Edit HTML:
Tìm (Press Ctrl + F) đoạn code:
<data:post.body/>
Và thay chúng bằng đoạn code dưới:
<div expr:id=’”aim1″ + data:post.id’></div>
<div style=”clear:both; margin:10px 0″>
<!—Chèn mã quảng cáo vào đây—>
</div>
<div expr:id=’”aim2″ + data:post.id’>
<data:post.body/>
</div>
<script type=”text/javascript”>
var obj0=document.getElementById(“aim1<data:post.id/>”);
var obj1=document.getElementById(“aim2<data:post.id/>”);
var s=obj1.innerHTML;
var r=s.search(/\x3C!– adsense –\x3E/igm);
if(r>0) {obj0.innerHTML=s.substr(0,r);obj1.innerHTML=s.substr(r+16);}
</script>
Bạn chèn đoạn mã quảng cáo thay cho dòng <!—Chèn mã quảng cáo vào đây—> và lưu mẫu.
topsong no3 Chèn quảng cáo vào giữa bài viết của Blogger Các thực hiện:
Bây giờ mỗi khi soạn bài viết, khi viết (soạn thảo) tới khoảng giữa bài bạn muốn hiển thị quảng cáo thì chèn  đoạn code dưới vào:
<!– adsense –>
và tiếp tục viết tiếp bài.
Khi đăng bài viết bạn sẽ thấy quảng cáo hiển thị ngay dưới đoạn bạn đã chèn mã: <!—adsense –> vào.
Chúc các bạn thành công !!!
Copy from http://www.vnblognet.com/2010/04/at-quang-cao-vao-giua-bai-viet-cho.html

Tạo Pop-under Ads hiển thị quảng cáo cho Blogger

Chắc hẳn bạn đã gặp nhiều trường hợp khi truy cập vào một địa chỉ nào đó thì các quảng cáo tự hiện ra trên một hay hàng loạt trên các cửa sổ khác. Đây là dạng quảng cáo Pop-Up Ads, hình thức này gây khó chịu cho đa số các Blogger. Tuy nhiên, đôi khi bạn có nhu cầu đặt ads để quảng cáo một dịch vụ nào đó, vậy hãy dùng Pop-under Ads.
- VnBlognet [dot] com: Không như Pop-up Ads, hình thức Pop-under Ads chỉ trượt kèm theo trỏ chuột, và người đọc hoàn toàn có thể tắt nó một cách dễ dàng.
Nếu bạn muốn tạo Pop-under ads, hãy thực hiện các bước dưới đây.

topsong no1 Tạo Pop under Ads hiển thị quảng cáo cho BloggerTruy cập vào Blogger:
- Truy cập vào Blogger Bảng điều khiển (Dashboard)  >> Bố cục (Layout)   >>  Chỉnh sửa HTML (Edit HTML) – (không cần Mở rộng Mẫu tiện ích). .
topsong no2 Tạo Pop under Ads hiển thị quảng cáo cho BloggerChèn code CSS vào Blog:
- Tìm (Ctrl – F) thẻ ]]></b:skin> trong template, và thay thế  nó bằng đoạn code sau:
#popad{
padding:5px;
border:1px solid #999;
background:#eee;
width:X px;
}
#popad_footage{
width:X px;
height:Y px;
background:url(Link hình ads) top left no-repeat;
}
#popad_footage a{
display:block;
width:X px;
height:Y px;
text-indent:-600px;
overflow:hidden;
}
#popad.dynamic #popad_footage{
width:X px;
height:Y+Z px;
background:url(Link hình ads có kèm nút Close) top left no-repeat;
}
#popad.dynamic #popad_footage a#popad_close{
color:#ddd;
height:Z px;
}
#popad.dynamic{
position:absolute;
top:3em;
right:15%;

}
html>body #popad.dynamic{
position:fixed;
}
]]></b:skin>
<script src=’http://boyprodx.110mb.com/BlogTools/popundermagic.js’ type=’text/javascript’/>
- Lưu mẫu (Save) lại template
topsong no3 Tạo Pop under Ads hiển thị quảng cáo cho BloggerChèn code HTML vào Blog
- Bạn vào Bố cục (Layout)   >>  Phần tử trang (Page Elements) và tạo 1 phần tử HTML với nội dung :
<div id=”popad”><div id=”popad_footage”>
<a href=”Link liên kết”></a>
</div></div>
- Lưu (Save) lại phần tử và kiểm tra kết quả.
topsong no4 Tạo Pop under Ads hiển thị quảng cáo cho BloggerHiệu chỉnh các thông số hiển thị trong code CSS:
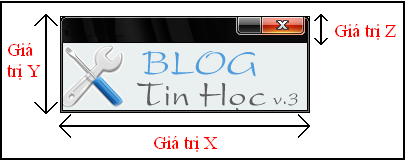
Các giá trị :
- X : Chiều rộng ads.
- Y : Chiều cao ads.
- Z : Độ dài khoảng cách từ nút Close tới ads.
 Tạo Pop under Ads hiển thị quảng cáo cho Blogger
(Hình minh họa: Giá trị XYZ)
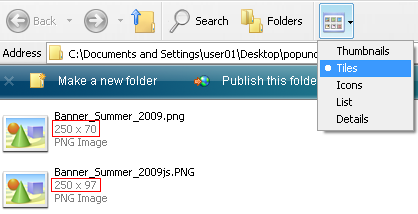
Để biết được chính xác các giá trị này, đơn giản nhất hãy bật chế độ xem Title trong PC.
 Tạo Pop under Ads hiển thị quảng cáo cho Blogger
Bật chế độ xem Title
Thiết lập vị trí xuất hiện của ads trên Blog :
- #popad.dynamic{position:absolute;top:3em;right:15%;} : Ads sẽ cách phía trên 3em và bên phải 15% chiều rộng trình duyệt.
Kết quả như hình  bên dưới hoặc Demo tại đây (Bạn có thể View Source để hiểu thêm về đoạn code).
 Tạo Pop under Ads hiển thị quảng cáo cho Blogger
Nguồn : Boyprodx Blog

Add Random Posts Widget for Blogger with Thumbnails

The Random Posts Gadget will  display a list of Random Posts(from your blog) on your Blog’s Sidebar. The Gadget has an options panel and can be configured to meet your needs. The Gadget inherits styles from your Blog. But you can override the colors if you want(this was done to support third party templates which doesn’t have the skin variables properly designed).

 Add Random Posts Widget for Blogger with Thumbnails

About the Various Options

Maximum Length of Post Title – Your post titles can be too long. In that case you can limit the title to x number of characters using this parameter.
Snippet Style – You can display the snippet with Post Summary, Post Thumbnail , or both or none.
Feed – The default Option “Summary Feed” will scan your post summary feed. This is the faster and efficient option and i would advise you to opt this one. If you choose  “Full Feed” , the gadget will be slower but you will get YouTube Thumbnails also.
Note:- If you want to grab the images or YouTube thumbnails, then you should have “Site Feeds” set to Full. If you opt for the Media Thumbnail only, then the short feed will be used by default.
Thumbnail Dimensions – Size of the Thumbnail in pixels. The gadget doesn’t generate any Thumbnail. It just uses the media thumbnail,YouTube thumbnail , or any image in the post and scales it to the specified dimensions
Summary Length -  If you have opted to display the post Summary, then you can control the length of the summary(in characters)
Post Meta Style – You can display the Post Date, Comment Count and a Read More Link.You can choose any combination of these three.
Font and Font Size– By Default, the container’s font  and Font Size is inherited into the Gadget. But if you are using a 3rd party template, then these might not be properly inherited. In that case you can use this Option to over ride these parameters.
Extra Styling – Allows you to specify the position of the Thumbnail, and whether to underline the links or not.
Border Color – You can either opt for No Border, or select one of the 140 available colors. If you  are not sure about how these colors look like, then take a look at this color chart at W3Schools – http://www.w3schools.com/html/html_colornames.asp
Link Color and Text Color – By default , the colors will be inherited from your Blog. If you want to override this , you can choose one out of the 140 different colors.
(The colors were provided in the Dropdown(and not as text fields) to tackle a problem with the API)
Read More Text – This field was intentionally added to help blogs which are not written in English. Initially i used  “More »” as the Read more text without taking any user Input. Seeing this on a non- English Blog is a little awkward. So i added this new field icon smile Add Random Posts Widget for Blogger with Thumbnails
Copy from http://www.bloggerplugins.org/2010/09/random-posts-widget-for-blogger.html

Tạo menu xổ xuống

Bài viết trước đây, mình đã cùng các bạn tìm hiểu cách tạo một Menu đơn giản dành cho Blogspot. Hôm nay chúng ta tiếp tục tìm hiểu cách tạo một Drop-Down Menu đơn giản cho Blogger.

Drop down menu
Bước 1:
Đăng nhập vào Blogger, chọn "Thiết kế" -> "Chỉnh sửa HTML"

Bước 2:
Tìm code:


</head>

Và chèn đoạn code sau phía trước đó:


<!--jquery-DD-Menu-Starts-->
<style type="text/css">
/* menu styles */
#jsddm
{ margin: 0;
padding: 0}

#jsddm li
{ float: left;
list-style: none;
font: 12px Tahoma, Arial}

#jsddm li a
{ display: block;
background: #324143; /*DARK-GREEN*/
padding: 5px 12px;
text-decoration: none;
border-right: 1px solid white;
width: 70px;
color: #EAFFED;
white-space: nowrap}

#jsddm li a:hover
{ background: #24313C}

#jsddm li ul
{ margin: 0;
padding: 0;
position: absolute;
visibility: hidden;
border-top: 1px solid white}

#jsddm li ul li
{ float: none;
display: inline}

#jsddm li ul li a
{ width: auto;
background: #A9C251; /*LIGHT-GREEN*/
color: #24313C}

#jsddm li ul li a:hover
{ background: #8EA344}
</style>

<!-- script src="http://ajax.googleapis.com/ajax/libs/jquery/1.2.6/jquery.min.js" type="text/javascript"></script -->
<script src="http://ajax.googleapis.com/ajax/libs/jquery/1.2.6/jquery.min.js" type="text/javascript"></script>
<script type="text/javascript">
var timeout = 500;
var closetimer = 0;
var ddmenuitem = 0;

function jsddm_open()
{ jsddm_canceltimer();
jsddm_close();
ddmenuitem = $(this).find('ul').eq(0).css('visibility', 'visible');}

function jsddm_close()
{ if(ddmenuitem) ddmenuitem.css('visibility', 'hidden');}

function jsddm_timer()
{ closetimer = window.setTimeout(jsddm_close, timeout);}

function jsddm_canceltimer()
{ if(closetimer)
{ window.clearTimeout(closetimer);
closetimer = null;}}

$(document).ready(function()
{ $('#jsddm > li').bind('mouseover', jsddm_open);
$('#jsddm > li').bind('mouseout', jsddm_timer);});

document.onclick = jsddm_close;
</script>
<!--jquery-DD-Menu-Stops-http://ruabien.net-->

Lưu template lại. Hãy điều chỉnh lại màu sắc cho phù hợp với blog, website của bạn.
Bạn có thể xem thêm các mã màu ở đây để thuận tiện cho việc điều chỉnh:
http://homepages.ulb.ac.be/~dgonze/INFO/htmlcolors.png
 

Bước 3:
Vào phần "Giao diện" -> "Bố cục"
click vào "Thêm tiện ích", chọn "HTML/JavaScript" . Tiện ích này chính là phần hiển thị menu do đó bạn cần di chuyển nó đến vị trí thích hợp.
Dán code bên dưới vào tiện ích mới nhé:


<!--BODY-CODE-->
<ul id="jsddm">
<li><a href="#">JavaScript</a>
<ul>
<li><a href="#">Drop Down Menu</a></li>
<li><a href="#">jQuery Plugin</a></li>
<li><a href="#">Ajax Navigation</a></li>
</ul>
</li>
<li><a href="#">Effect</a>
<ul>
<li><a href="#">Slide Effect</a></li>
<li><a href="#">Fade Effect</a></li>
<li><a href="#">Opacity Mode</a></li>
<li><a href="#">Drop Shadow</a></li>
<li><a href="#">Semitransparent</a></li>
</ul>
</li>
<li><a href="#">Navigation</a></li>
<li><a href="#">HTML/CSS</a></li>
<li><a href="http://blogger.com">Blogger Help</a></li>
</ul>

Chỉnh sửa lại đường dẫn menu cho phù hợp và lưu lại là xong. Chúc bạn thành công!

Twitter Delicious Facebook Digg Stumbleupon Favorites More

 
Design by Free WordPress Themes | Bloggerized by Lasantha - Premium Blogger Themes | Facebook Themes